Creating Beautiful and Safe Outdoor Spaces
Outdoor lighting changes how homes look and feel after dark. Good lighting makes properties safer, more secure, and beautiful during evening hours. Whether homeowners want to light walkways, highlight gardens, or create cozy entertainment areas, the right lighting makes all the difference.
Many homeowners struggle with choosing the right outdoor lighting for their needs. Some lights work better for safety, while others focus on beauty or entertainment. Smart planning helps create outdoor spaces that look amazing while keeping families safe.
This guide shares 50 outdoor lighting ideas perfect for Fort Mill, SC homes. From simple solar lights to complex electrical installations, these options cover every budget and skill level. Safety information helps homeowners understand when professional installation is needed and when DIY projects work well.

Table of Contents

Safety Foundations for Outdoor Lighting
Electrical safety becomes critical with outdoor lighting installations. Water, weather, and electricity create dangerous combinations without proper planning and equipment. Understanding basic safety rules protects families and property from electrical hazards.
Weather-Resistant Equipment Requirements
Outdoor electrical equipment needs special ratings to handle weather exposure. The IP (Ingress Protection) rating system shows how well fixtures resist water and dust. IP65 ratings protect against water jets from any direction, making them suitable for most outdoor applications.
Wet location fixtures can handle direct water contact, like rain or sprinkler systems. Damp location fixtures work in covered areas where moisture might be present but direct water contact doesn’t occur. Using the wrong rating can cause equipment failure or create fire hazards.
GFCI Protection and Electrical Safety
Ground Fault Circuit Interrupter (GFCI) protection is required for all outdoor electrical outlets and many lighting circuits. GFCI devices detect electrical leaks and shut off power quickly to prevent electrocution. This protection saves lives when water and electricity come together unexpectedly.
Wire gauges must match the electrical load and distance from power sources. Longer wire runs need heavier gauges to carry electricity safely. Underground wiring requires special burial depths and protection to prevent damage from digging or settling.
Professional electricians understand these complex requirements and local code variations. While some simple solar lights can be DIY projects, most electrical outdoor lighting needs professional electrical services for safe installation.
Pathway and Walkway Lighting Ideas
Safe pathways prevent trips and falls while guiding visitors to entrances. These lighting options range from simple solar fixtures to permanent electrical installations that provide reliable illumination year-round.
- Solar Stake Lights Along Garden Paths
Solar stake lights offer easy installation without electrical work. These fixtures charge during the day and automatically turn on at dusk. Quality varies widely, so choosing well-made units with good solar panels and LED bulbs provides better performance.
- LED Strip Lights Under Deck Railings
LED strips mounted under deck railings create subtle pathway lighting that doesn’t interfere with star viewing. These low-profile lights highlight step edges and pathway boundaries while using very little electricity.
- Bollard Lights for Driveways
Bollard lights stand about three feet tall and provide steady illumination for driveways and larger pathways. Their sturdy construction resists vehicle damage while creating defined boundaries for parking areas.
- In-Ground Well Lights for Stone Walkways
Well lights install flush with the ground to light walkways from below. These fixtures work especially well with natural stone pathways where traditional post lights might interfere with the natural look.
- Rope Lights Outlining Sidewalks
Flexible rope lights can outline curved sidewalks and pathways. LED rope lights last longer and use less energy than older incandescent versions. Proper outdoor-rated rope lights handle weather exposure without problems.
- Motion-Sensor Path Lights
Motion-activated pathway lights save energy while providing security benefits. These lights turn on when movement is detected, alerting homeowners to visitors or potential intruders approaching the house.
- Low-Voltage System Installations
Low-voltage lighting systems use transformers to reduce standard house current to 12 volts. This safer voltage reduces shock risks while providing flexible installation options. Professional installation helps create reliable systems that last for years.
- Lantern-Style Post Lights
Traditional lantern-style post lights work well for both pathway lighting and decorative purposes. Modern LED versions provide the classic look while using much less energy than older bulb types.

Entrance and Porch Lighting Ideas
Front entrances need welcoming lighting that helps visitors feel safe while highlighting architectural features. Good entrance lighting combines practical illumination with attractive design elements.
- Classic Coach Lanterns Beside Front Doors
Coach lanterns mounted beside front doors provide traditional styling that works with many home designs. These fixtures should be sized appropriately for the door and mounting height to look proportional.
- Pendant Lights Over Entryways
Hanging pendant lights work well over covered entryways and porches. These fixtures need adequate clearance for tall visitors while providing good light coverage for the entrance area.
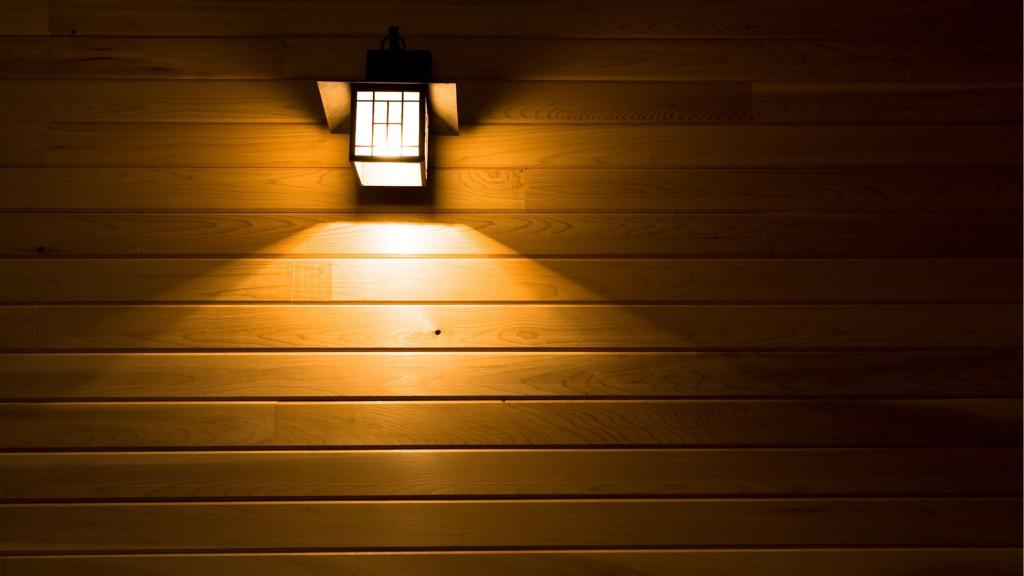
- Wall Sconces Flanking Garage Doors
Garage doors often lack adequate lighting for nighttime use. Wall sconces mounted on either side of garage doors improve safety and security while adding architectural interest to plain garage walls.
- String Lights Across Covered Porches
String lights create festive atmosphere for covered porches and entertainment areas. Outdoor-rated string lights with LED bulbs provide energy-efficient lighting that can stay up year-round.
- Recessed Lighting in Soffits
Recessed lights installed in roof soffits provide subtle entrance lighting that doesn’t interfere with architectural lines. These fixtures need proper housing for insulation contact and weather protection.
- Smart Doorbell Cameras with Built-in Lights
Modern smart doorbells include LED lights that improve video quality while providing entrance illumination. These devices combine security features with practical lighting functions.
- Vintage Edison Bulb Fixtures
Edison-style LED bulbs in appropriate fixtures create vintage charm while using modern energy-efficient technology. These bulbs work well in exposed fixtures where the bulb design becomes part of the decoration.
- Modern Geometric Wall-Mounted Fixtures
Contemporary homes benefit from geometric wall fixtures that complement modern architectural styles. These fixtures often use integrated LED technology for clean lines and energy efficiency.

Garden and Accent Lighting Ideas
Outdoor spaces come alive after dark with thoughtful accent lighting. These ideas highlight natural features, architectural elements, and garden focal points while creating magical nighttime atmospheres.
- Uplighting for Trees and Architecture
Ground-mounted fixtures that shine light upward create dramatic effects on trees and building walls. This technique, called uplighting, adds depth and interest to nighttime views while highlighting impressive features.
- Spotlights Highlighting Garden Focal Points
Adjustable spotlights can highlight garden sculptures, specimen plants, or architectural features. Quality fixtures with good beam control prevent light spillage into neighboring properties while creating focused accent lighting.
- Well Lights for Flower Beds
In-ground well lights provide upward illumination for flower beds and garden borders. These fixtures stay hidden during the day while creating beautiful lighting effects at night.
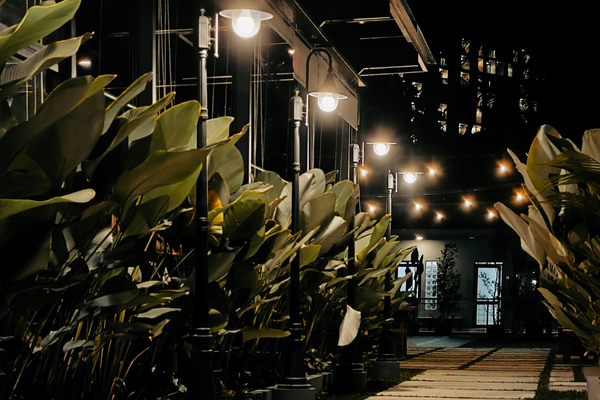
- Moonlighting Through Tree Canopies
Lights mounted high in tree branches create dappled shadows similar to moonlight filtering through leaves. This subtle technique provides ambient lighting while maintaining natural appearances.
- Color-Changing LED Garden Lights
LED lights with color-changing capabilities allow homeowners to adjust lighting moods for different occasions. These fixtures can provide white light for everyday use and colored light for parties or holidays.
- Solar Flower Lights in Garden Beds
Decorative solar lights shaped like flowers add whimsical touches to garden beds during the day and provide gentle illumination at night. These fixtures work well scattered throughout larger garden areas.
- Illuminated Planters and Containers
Planters with built-in lighting or lights added to existing containers create portable accent lighting. LED strips or small spotlights can be added to large containers for dramatic effects.
- Fairy Lights Wrapped Around Shrubs
Small LED fairy lights wrapped around shrubs and small trees create magical garden atmospheres. Battery-powered or solar versions eliminate the need for electrical connections in remote garden areas.
- Ground-Level Accent Lights for Sculptures
Low-profile fixtures that shine across garden sculptures or decorative elements create interesting shadow patterns while highlighting artistic features without overwhelming them.
- Pond and Water Feature Lighting
Underwater and near-water lighting creates stunning effects with ponds, fountains, and waterfalls. Special submersible fixtures handle water contact while low-voltage systems improve safety around water features.
- Rock Lights for Natural Stone Features
Small fixtures designed to look like rocks blend seamlessly with natural stone features while providing accent lighting. These lights work well along retaining walls or rock gardens.
- Silhouette Lighting Behind Plants
Lights placed behind interesting plants create silhouette effects against walls or fences. This technique works especially well with plants that have distinctive shapes or interesting branch patterns.

Entertainment and Living Space Lighting
Outdoor living spaces need flexible lighting that adapts to different activities and moods. These ideas create inviting atmospheres for dining, entertaining, and relaxing outdoors.
- String Lights Over Outdoor Dining Areas
Overhead string lights create intimate dining atmospheres while providing adequate illumination for outdoor meals. Dimmer controls allow adjustment for different occasions and activities.
- Fire Pit Lighting with Surrounding Fixtures
Fire pits provide central focal points, but surrounding lighting helps with safety and extends usable space. Low-level pathway lights and accent lighting create complete entertainment areas.
- Pool and Spa Lighting Systems
Swimming pools and spas need specialized lighting that enhances safety while creating beautiful water effects. LED pool lights offer energy efficiency and color options for different moods.
- Deck Lighting Under Railings and Steps
Deck safety improves dramatically with proper step and railing lighting. LED strips or small fixtures mounted under railings provide safety lighting without creating glare or light pollution.
- Gazebo and Pergola Lighting
Covered outdoor structures benefit from built-in lighting that extends their usable hours. Ceiling fans with lights, pendant fixtures, or string lights all work well in these applications.
- Outdoor Kitchen Task Lighting
Outdoor cooking areas need adequate task lighting for food preparation and safety. Under-cabinet LED strips or pendant lights over work areas provide necessary illumination for outdoor kitchens.
- Bar Area Pendant Lights
Outdoor bars benefit from pendant lighting that creates defined spaces while providing good illumination for socializing. These fixtures help establish outdoor rooms within larger spaces.
- Tiki Torches for Tropical Ambiance
Traditional tiki torches or modern LED versions create tropical atmospheres for themed entertainment areas. Fuel-based torches also provide natural insect repelling properties.
- Lanterns on Patio Tables
Portable table lanterns provide intimate lighting for outdoor dining while allowing flexibility for different table arrangements. Solar or battery-powered lanterns eliminate cord management issues.
- String Globe Lights in Trees
Large globe bulbs on string lights create dramatic overhead lighting when hung between trees or structures. These fixtures provide more light than smaller string lights while maintaining festive appearances.
- Solar Umbrella Lights
Patio umbrellas with built-in solar lights or clip-on solar fixtures extend the usable time for outdoor seating areas. These lights charge during the day and automatically turn on at dusk.
- Outdoor Chandeliers for Covered Areas
Elaborate chandeliers designed for outdoor use create elegant focal points in covered entertainment areas. Weather-resistant materials and finishes allow these fixtures to handle outdoor conditions.
Security and Motion Lighting Ideas
Security lighting protects property while deterring criminal activity. Motion-activated and automatic lighting systems provide safety benefits while conserving energy through smart operation.
- Motion-Activated Floodlights
High-intensity floodlights with motion sensors provide excellent security lighting for large areas. Adjustable sensitivity and timer settings allow customization for different applications and preferences.
- Smart Security Lights with Cameras
Modern security lights combine LED illumination with built-in cameras and smart home integration. These devices send alerts to smartphones and provide video evidence when motion is detected.
- Solar Motion Sensors for Dark Corners
Battery or solar-powered motion lights work well in areas without electrical access. These fixtures provide security lighting for sheds, garages, and remote areas of properties.
- Dusk-to-Dawn Automatic Fixtures
Photocell-controlled lights turn on automatically when darkness falls and turn off at sunrise. These fixtures provide consistent security lighting without manual operation or timers.
- Pathway Lights with Motion Detection
Motion-activated pathway lights provide energy savings while maintaining safety. These fixtures stay dim for ambient lighting and brighten when movement is detected.
- Garage Door Opener Lights
Modern garage door openers include LED lights that provide automatic illumination when doors operate. These lights improve safety while providing convenient lighting for garage access.

Creative and Decorative Options
Unique lighting ideas add personality and charm to outdoor spaces. These creative options range from simple DIY projects to artistic installations that make properties stand out.
- Mason Jar Solar Lights in Trees
DIY mason jar lights with solar lids create charming rustic lighting for trees and garden areas. These projects combine creativity with practical lighting while adding personal touches to outdoor spaces.
- Illuminated Address Numbers
Backlit or LED address numbers improve visibility for emergency services while adding modern styling to home exteriors. These fixtures combine practical function with architectural enhancement.
- Glow-in-the-Dark Stepping Stones
Phosphorescent materials added to stepping stones or pathway markers provide subtle guidance without electricity. These elements charge during the day and glow softly after dark.
- Holiday and Seasonal Lighting Displays
Permanent lighting infrastructure makes seasonal decorating easier and more elaborate. Built-in electrical connections and mounting points allow quick installation of holiday lights and decorations.

Planning Your Outdoor Lighting Design
Successful outdoor lighting requires careful planning that considers safety, beauty, and practical needs. Creating a lighting plan before installation prevents costly mistakes and creates better results.
Creating Lighting Zones and Layers
Different outdoor areas need different types of lighting. Safety areas like pathways need consistent illumination, while entertainment areas benefit from adjustable ambient lighting. Accent lighting highlights special features without overwhelming other elements.
Balancing Different Lighting Types
Ambient lighting provides general illumination for outdoor spaces. Task lighting focuses on specific activities like cooking or reading. Accent lighting highlights architectural features, plants, or decorative elements. Good outdoor lighting combines all three types appropriately.
Dark Sky Considerations
Light pollution affects wildlife and astronomical viewing while wasting energy. Shielded fixtures that direct light downward reduce sky glow while providing better illumination for intended areas. Full cutoff fixtures eliminate upward light entirely.
Energy Efficiency and Solar Options
LED lights use much less energy than traditional bulbs while lasting much longer. Solar lights eliminate electrical connections but need adequate sun exposure to charge properly. Combining different technologies creates efficient lighting systems.
Budgeting for Materials and Installation
Simple solar lights cost very little but provide limited performance. Professional electrical installations cost more initially but provide reliable long-term performance. Planning helps homeowners balance costs with desired results.

Installation Safety Guide
Outdoor electrical work requires special safety precautions beyond indoor projects. Water, weather, and burial requirements create unique challenges that demand careful attention to safety procedures.
Tools Needed for Safe Installation
Proper tools make outdoor electrical work safer and more successful. Non-contact voltage testers verify that power is off before working on circuits. GFCI outlet testers confirm that protection devices work correctly.
Trenching tools help bury wiring to proper depths required by electrical codes. Waterproof wire connectors prevent moisture problems that cause failures or safety hazards. Quality tools last longer and work better than cheap alternatives.
Working with Electrical Circuits Outdoors
Outdoor electrical work requires GFCI protection and weather-resistant equipment. Underground wiring needs proper burial depths and protection from damage. Direct burial cable costs more than regular wire but eliminates the need for conduit in many applications.
Professional electricians understand complex code requirements for outdoor installations. Expert electrical services provide safe installations that pass inspection and work reliably for years. Johnathon Brown Electric brings over 30 years of experience to outdoor lighting projects in Fort Mill, SC.
Proper Wire Connections and Weatherproofing
Electrical connections outdoors need special weatherproof treatment to prevent failures. Regular wire nuts don’t provide adequate protection for outdoor use. Waterproof connectors and enclosures keep moisture out of electrical connections.
All electrical boxes and junction points need weatherproof covers and gaskets. Even small amounts of moisture can cause ground faults, equipment damage, or fire hazards. Professional installation includes proper weatherproofing techniques.
Testing Installations Before Final Assembly
New electrical installations should be tested thoroughly before final assembly and burial. Voltage measurements confirm proper connections and operation. GFCI testing verifies that safety devices work correctly.
Temporary connections allow testing before permanent installation. Problems found during testing are much easier and cheaper to fix than problems discovered after burial or final assembly.
Maintenance Schedules and Seasonal Checks
Outdoor lighting systems need regular maintenance to continue working safely and reliably. Seasonal inspection schedules help identify problems before they cause failures or safety hazards.
Fall preparation includes cleaning fixtures, checking for damage, and testing timer and photocell operations. Spring startup includes bulb replacement, fixture cleaning, and connection inspection. Regular maintenance extends equipment life and maintains safety.

Troubleshooting Common Issues
Outdoor lighting systems can develop problems that affect performance or safety. Understanding common issues helps homeowners identify when professional help is needed and when simple fixes work.
Flickering Lights and Voltage Drops
Flickering outdoor lights often indicate loose connections or voltage problems. Long wire runs can cause voltage drops that affect light performance. Professional electricians can measure voltages and identify connection problems safely.
Corroded connections cause increasing resistance that leads to voltage drops and heat buildup. These problems get worse over time and can create fire hazards if not corrected promptly.
Water Damage Prevention
Water damage is the most common cause of outdoor lighting failures. Proper fixture selection and installation prevent most water-related problems. GFCI protection prevents electrical hazards when water does enter electrical systems.
Regular inspection helps identify potential water entry points before damage occurs. Caulking and gasket replacement are simple maintenance tasks that prevent expensive repairs.
Replacing Bulbs and Fixtures Safely
Outdoor electrical work requires special safety precautions even for simple tasks like bulb replacement. Power should be turned off at the circuit breaker before working on fixtures, especially in wet conditions.
Replacement bulbs and fixtures must match voltage and current ratings of existing installations. Mixing different bulb types or exceeding fixture ratings can create safety hazards or equipment damage.
Timer and Smart Control Problems
Automatic controls make outdoor lighting more convenient but can develop problems that affect operation. Photocells can become dirty or fail, causing lights to operate incorrectly. Timers may need adjustment for seasonal time changes.
Smart lighting controls offer advanced features but require proper setup and network connections. Professional installation helps create reliable smart lighting systems that work consistently.
Professional Installation for Best Results
Complex outdoor lighting projects benefit from professional design and installation. Licensed electricians understand code requirements, safety procedures, and installation techniques that create reliable long-term results.
Johnathon Brown Electric specializes in outdoor lighting installations for Fort Mill, SC properties. Their experienced team handles everything from simple fixture replacement to complete lighting system design and installation. Professional installation provides warranty protection and insurance coverage that DIY projects cannot match.
Planning and design services help homeowners create lighting systems that meet their needs while staying within budget. Professional installation includes permits, inspections, and code compliance that protect property values and insurance coverage.
Contact professional electricians for complex outdoor lighting projects that require electrical expertise. Quality installation creates beautiful, safe outdoor spaces that families can enjoy for years to come.